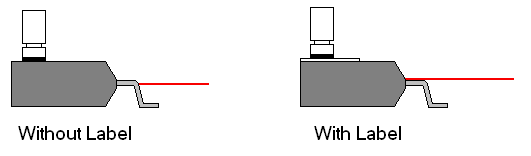
Teaching the Label Presenter Location
Teaching the label presenter location is more of a challenge in comparison to teaching other pick and place locations as it requires that the X-axis, Y-axis, and Z-axis to be manually taught.
Typically, a label would be too thin to be measured with the CyberOptics vision centering system, so you will have to manually locate the center of the label using the laser pointer on a 3000 series autohandler or the downward vision camera on a 4000 series autohandler.
It is important to understand that the accuracy of the Z-axis teach location will affect the performance of the pick operation on the label. With a normal part, if the Z-axis teach location is a little high then the Pick-and-Place nozzle can still suck the part up when the vacuum is on, however, if the Z-axis teach is a little high for the labels, it will fail to pick the label as the label will have downward resistance due to the adhesive bond with the backing tape.
Conversely if the Z-axis teach location is too low, then the Pick-and-Place nozzle will overdrive the label causing the label to be compressed on to the backing making it increasingly difficult to remove and again result in a pick failure.
It is preferable to manually teach the Z-axis location using the Z-axis control described in manually teach the Z-axis position. This will allow you to precisely position the Pick-and-Place nozzle on top of the label and then record the position as the learned Z-axis location.
Note: Using the Auto Learn Z-axis feature to learn the Z-axis location will learn the location too high and introduce pick failures when picking a label. This is because labels are prone to be "lifted" by the vacuum of the Pick-and-Place nozzle.
- Make the appropriate entries in the Autohandler Workflow Settings dialog to teach.
- Select Autohandler > Teach... from the pull-down menu. The Select Location to Teach dialog appears on the screen.
- Select the LABELPRESENTER name.
- Click the Teach button.
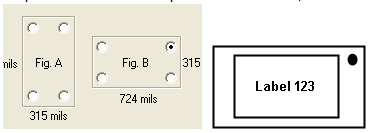
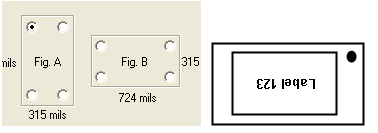
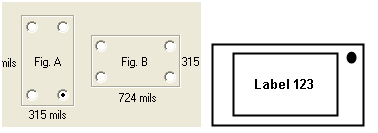
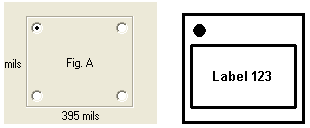
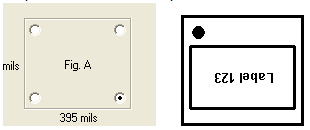
- Select the Pin 1 radio button from Figure A or B to designate the orientation of pin 1 on the label to properly orient the label to the device.
Orienting the Label using Label Presenter provides more information on determining the selection. - Use the directional arrow buttons to position the Pick-and-Place nozzle over the center of the label.
- Teach the Z-axis location using the Z-axis control described in To manually teach the Z-axis position.
- Click OK.
Label Thickness
When a label is attached to the device, the device becomes slightly thicker. This can cause alignment problems with the Laser Align Camera. Entering the label thickness will allow the software to adjust the alignment offset.
Label Orientation
This section provides helpful information in setting up the Label Presenter settings for proper label orientation on the device.
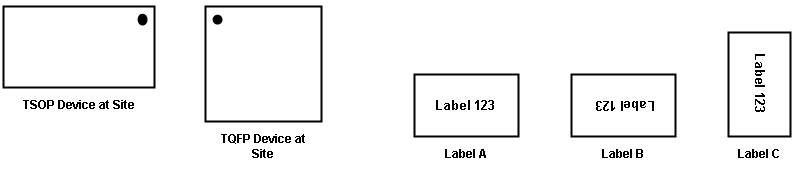
The key to correctly orienting the label is to remember that BPWin will match the pin 1 designation on the label to the pin 1 designation of the site. Whatever edge or corner of the label to be placed near pin 1 is the radio button to be selected.
Examples:
The examples provided below show what radio button to select for different label placements. The orientation of the devices and labels pictured below is how it would appear standing at the front of the handler. Screenshots are from the Nozzle Adjust Position: LABELPRESENTER dialog. These examples can be adapted to your unique set-up.
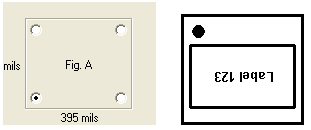
TSOP and Label A
To place the "L" nearest pin 1 on the device, click on the lower or upper left radio button in Fig. B. The label will be turned 180 degrees.

To place the "3" nearest pin 1 on the device, click on the lower or upper right radio button in Fig. B. The label will not be turned.
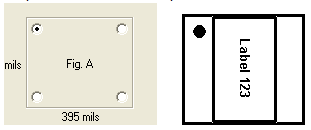
TSOP and Label B
To place the "L" nearest pin 1, click on the lower or upper right radio button in Fig. B. The label will not be turned.
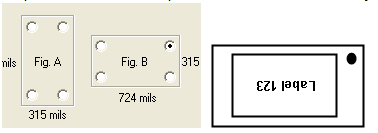
To place the "3" nearest pin 1, click on the lower or upper left radio button in Fig. B. The label will be turned 180 degrees.
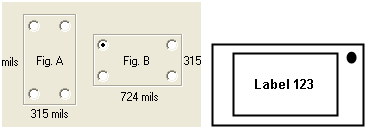
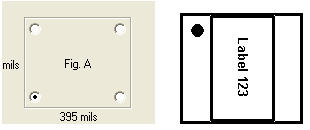
TSOP and Label C
To place the "L" nearest pin 1, click on the upper left or right radio button in Fig. A. The label will be turned 90 degrees.
To place the "3" nearest pin 1, click on the lower left or right radio button in Fig. A. The label will be turned -90 degrees.
TQFP and Label A
To place the "L" nearest pin 1 on the device with horizontal placement, click on the upper left radio button. The label will not be turned.
To place the "3" nearest pin 1 on the device with horizontal placement, click on the lower right radio button. The label will be turned 180 degrees.
To place the "L" nearest pin 1 on the device with vertical placement, click on the lower left radio button. The label will be turned 90 degrees.
TQFP and Label C
To place the "L" nearest pin 1 on the device with vertical placement, click on the upper left radio button. The label will not be turned.
To place the "3" nearest pin 1 on the device with horizontal placement, click on the lower left radio button. The label will be turned 90 degrees.
Related Articles
Label Printing in BPWin
Label Printing BPWin can generate printed labels and programmed RFID tags using dynamic data from the current job session. All label printers that support a text-based command language are supported. This includes virtually all commercial and ...BPM Automated Pick and Place Issues
Indicators Pick errors, place errors or vision centering problems occur frequently during a job session. Troubleshoot Ensure that the stations and the package are taught correctly. This is the cause of the majority of Pick-and-Place problems. Run ...BPM Automated Pick and Place Issues
Indicators Pick errors, place errors or vision centering problems occur frequently during a job session. Troubleshoot Ensure that the stations and the package are taught correctly. This is the cause of the majority of Pick-and-Place problems. Run the ...Device Package Parameters
Device Package Dimensions The CyberOptics laser alignment camera is the heart of the vision centering system and you will need to specify the dimensions of your device. A library of package types comes with the BPWin software. The settings for a ...Where do i find the BlackBox file
BPWin logs most actions in a "BlackBox" log file. This file is located in the "BP\DATALOG" folder in the home directory, named "BlackBox.html". Batches of folders can also be created, named with a date and time stamp to help location files created ...